Introduction: Why Make Another “Avoid the Obstacles” Game?
Look, I know what you’re thinking. “Another helicopter/flappy bird clone? Really?” But hear me out! Building a side-scrolling obstacle avoidance game is like the “Hello World” of game development – except instead of printing text, you’re creating something that will consume hours of your life as you try to beat your own high score at 2 AM.
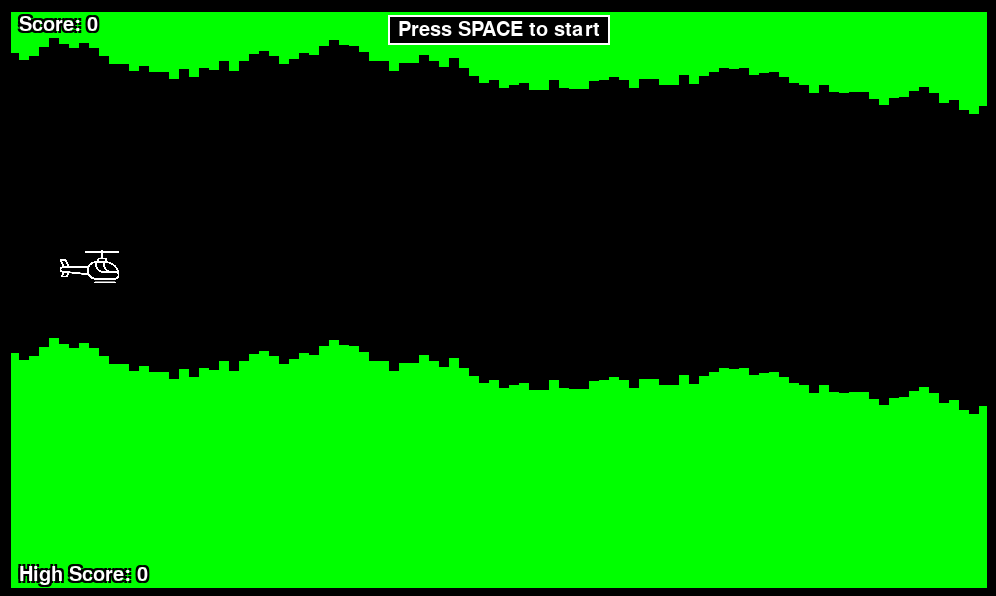
Plus, there’s something deeply satisfying about watching a little helicopter navigate through procedurally generated caves, especially when you made those caves. It’s like being a tiny digital god, except your worshippers constantly crash into walls.
In this tutorial, we’ll build a complete helicopter game from scratch using Python and Pygame. We’ll cover:
- Setting up a proper game loop (the heartbeat of every game)
- Procedural terrain generation (fancy words for “making random caves”)
- Physics and collision detection (why your helicopter can’t just fly through walls)
- Progressive difficulty scaling (so players don’t rage-quit immediately)
- A menu system (because professionals don’t just throw players into the action)
By the end, you’ll have a fully functional game with a clean code structure that won’t make you cry when you look at it six months later.
What You’ll Need:
- Python 3.7+ (the language that makes game dev accessible)
- Pygame library (our graphics engine / best friend)
- A text editor (VS Code, PyCharm, or even Notepad if you’re feeling masochistic)
- Patience (debugging game loops builds character)
- Coffee (optional but recommended)
Estimated Time: 2-3 hours (or 6+ if you start tweaking colors and “just testing” the game)
Let’s dive in!
Part 1: Setting Up Your Game Foundation
Step 1: Installing Pygame and Project Structure
Step 0: Setting Up Your Environment
If you have not installed Python on your computer yet, or if you are unsure of whether you have it already, please refer to our article on getting Python up and running.
And, before we go any further, please make sure you have a virtual environment set up. If you work on more than one Python project—or plan to—virtual environments are not optional. Even if this is the only Python project you plant to ever work on (hopefully you’ll actually want to build more after this tutorial), let’s just get into the habit of doing things the right way.
If you need help setting up a virtual environment, or if you just need a quick refresher, please check out our virtual environment article.
Step 1: Installing Pygame and Project Structure
First, let’s get Pygame installed and create a sensible project structure. Future you will thank present you for not cramming everything into one file.
# Install Pygame
pip install pygame

# Create project structure
mkdir copter_game
cd copter_game
mkdir src assets
touch main.pyYour directory should look like this:
├── main.py
├── assets/
└── src/
Pro tip: That assets folder is where your helicopter image will live. For now, the game will work fine with just a circle, but adding a sprite later makes it feel 10x more professional (and let’s be honest, cooler).
If you’d like to use the helicopter image I’ve created, feel free to download it from the GitHub repository.
Step 2: Creating the Settings File
Let’s start with a settings file. This is where all our magic numbers will live. Trust me, having all your constants in one place is a game-changer when you inevitably decide that “speed 2” isn’t fast enough.
File: src/settings.py
"""
Game settings and configuration constants
Because hardcoding numbers everywhere is a recipe for sadness
"""
import pygame

# Window settings
WIN_WIDTH = 1000
WIN_HEIGHT = 600
FPS = 60  # Sweet spot for smooth gameplay without melting your CPU

# Colors (RGB values - Red, Green, Blue)
BLACK = (0, 0, 0)
GREEN = (0, 255, 0)  # Classic cave green, very 1980s
WHITE = (255, 255, 255)
GRAY = (128, 128, 128)
DARK_GREEN = (0, 180, 0)

# Player settings
PLAYER_START_X = 100  # Start position - not too close to the edge
PLAYER_START_Y = 300  # Middle of the screen
PLAYER_RADIUS = 20    # Collision detection circle
GRAVITY = 0.3         # The constant nemesis of your helicopter

# Terrain settings
RECT_WIDTH = 10       # Width of each terrain segment
TERRAIN_GAP = 300     # Space between floor and ceiling (your flying corridor)
TERRAIN_VARIATION = 10  # How much terrain can change between segments

# Game difficulty settings
INITIAL_MAP_SPEED = 2
SPEED_INCREASE_RATE = 50  # Points needed for speed to increase
SPACER_INCREASE_RATE = 100  # Points needed for terrain to get more variable
MAX_SPEED = 40  # Speed cap so the game doesn't become literally impossible

# Font settings
FONT_NAME = 'freesansbold.ttf'  # Default Pygame font
FONT_SIZE = 20
MENU_FONT_SIZE = 40
TITLE_FONT_SIZE = 60

# Asset paths
HELICOPTER_IMAGE = 'assets/helicopter.png'
HELICOPTER_SIZE = (60, 60)Why This Matters: Having a settings file means you can tweak the game feel without hunting through your code. Want to make it harder? Increase GRAVITY. Want to make it more forgiving? Increase TERRAIN_GAP. Want to see how absurd it gets? Set MAX_SPEED to 100 and enjoy the chaos.
Part 2: Building the Helicopter (Our Heroic Protagonist)
Now let’s create our player – the helicopter that will bravely face countless deaths against green rectangles.
File: src/player.py
"""
Player (Helicopter) class
The star of our show, destined for greatness (or more likely, crashing)
"""
import pygame
from src.settings import *


class Helicopter:
    def __init__(self, x, y):
        """Initialize the helicopter at position (x, y)"""
        self.x = x
        self.y = y
        self.y_speed = 0  # Vertical velocity
        self.flying = False  # Is the spacebar pressed?
        self.radius = PLAYER_RADIUS

        # Try to load helicopter image (gracefully handle missing images)
        try:
            image = pygame.image.load(HELICOPTER_IMAGE)
            self.image = pygame.transform.scale(image, HELICOPTER_SIZE)
        except pygame.error:
            # No image? No problem! We'll just use a circle
            self.image = None
            print("Helicopter image not found - using circle instead")

    def reset(self, y=None):
        """
        Reset helicopter to starting position
        Called when starting a new game or after crashing
        """
        self.x = PLAYER_START_X
        if y is not None:
            self.y = y  # Use provided y if terrain gives us a safe spot
        else:
            self.y = PLAYER_START_Y
        self.y_speed = 0
        self.flying = False

    def set_flying(self, flying):
        """
        Control whether helicopter is ascending
        flying=True: Apply upward force
        flying=False: Gravity takes over
        """
        self.flying = flying

    def update(self):
        """
        Update helicopter position based on physics
        Called every frame (60 times per second)
        """
        if self.flying:
            # Flying: accelerate downward (yes, this seems backwards)
            # But this creates the "flappy" mechanic where you fight gravity
            self.y_speed += GRAVITY
        else:
            # Not flying: accelerate upward (decelerate downward motion)
            self.y_speed -= GRAVITY

        # Apply velocity to position
        # Negative because pygame's y-axis increases downward
        self.y -= self.y_speed

    def draw(self, window):
        """Draw helicopter on the screen"""
        # Draw the collision circle (this is what actually hits things)
        circle = pygame.draw.circle(
            window,
            BLACK,
            (int(self.x), int(self.y)),
            self.radius
        )

        # Draw helicopter image on top if available
        if self.image:
            window.blit(self.image, (self.x - 40, self.y - 30))

        return circle

    def get_rect(self):
        """
        Get collision rectangle for the helicopter
        Used for collision detection with terrain
        """
        return pygame.Rect(
            self.x - self.radius,
            self.y - self.radius,
            self.radius * 2,
            self.radius * 2
)Key Concepts Here:
- The Flying Mechanic: Notice the slightly counterintuitive physics. When you press spacebar (
flying=True), we add to y_speed (making it fall faster), but then we subtract y_speed from position. This creates that “tap to fly” mechanic where the helicopter wants to fall, and you’re constantly fighting gravity. It’s like real helicopter physics, except totally not. - Collision Detection: We use a circular hitbox (the
get_rect()method). Yes, it’s technically a rectangle that contains a circle. The circle is for visual purposes, the rectangle is for collision math. Game development is full of these little lies. - Graceful Degradation: No helicopter image? No problem. The game works fine with just a circle. This is called “graceful degradation” and it’s much better than having your game crash because you forgot to add a PNG file.
Part 3: Generating Terrain (Procedural Cave Creation)
This is where things get interesting. We need to generate terrain that’s random enough to be challenging but fair enough that players don’t immediately crash into impossible situations.
File: src/terrain.py
"""
Terrain generation and management
AKA "The Green Rectangles of Doom"
"""
import random
import pygame
from src.settings import *


class Terrain:
    def __init__(self, window):
        self.window = window
        self.rects = []  # List of terrain rectangles
        self.total_rects = WIN_WIDTH // RECT_WIDTH  # How many segments to fill screen
        self.spacer = TERRAIN_VARIATION
        self.speed = INITIAL_MAP_SPEED
        self.score = 0
        self.speed_level = 0
        self.next_speed_threshold = SPEED_INCREASE_RATE

    def generate_new(self):
        """
        Generate a brand new cave system
        Returns a safe Y position for the helicopter to start
        """
        self.rects = []
        top_height = random.randint(0, 300)  # Random starting height

        # Generate terrain across the entire screen width
        for i in range(self.total_rects):
            # Randomly vary height, but not too much
            top_height = random.randint(
                max(0, top_height - self.spacer),
                min(300, top_height + self.spacer)
            )

            # Create top rectangle (ceiling)
            top_rect = (i * RECT_WIDTH, 0, RECT_WIDTH, top_height)

            # Create bottom rectangle (floor)
            bot_rect = (
                i * RECT_WIDTH,
                top_height + TERRAIN_GAP,  # Gap for flying
                RECT_WIDTH,
                WIN_HEIGHT
            )

            self.rects.append(top_rect)
            self.rects.append(bot_rect)

        # Return a safe Y position in the middle of the gap
        return top_height + 150

    def reset(self):
        """Reset terrain for a new game"""
        self.spacer = TERRAIN_VARIATION
        self.speed = INITIAL_MAP_SPEED
        self.score = 0
        self.speed_level = 0
        self.next_speed_threshold = SPEED_INCREASE_RATE
        return self.generate_new()

    def update(self):
        """
        Move terrain left and generate new segments
        This is called every frame to create the scrolling effect
        """
        # Move all rectangles left by speed amount
        for i in range(len(self.rects)):
            rect = self.rects[i]
            self.rects[i] = (rect[0] - self.speed, rect[1], RECT_WIDTH, rect[3])

        # Remove off-screen rectangles (the ones that scrolled past)
        # Use while loop because at high speeds, multiple pairs can go off-screen per frame
        while len(self.rects) > 0 and self.rects[0][0] + RECT_WIDTH < 0:
            self.rects.pop(0)  # Remove top rectangle
            self.rects.pop(0)  # Remove bottom rectangle
            self.score += 1     # Award point for surviving past this segment

        # Generate new rectangles on the right side
        # Keep generating until the screen is completely filled
        # This prevents gaps at high speeds
        while len(self.rects) > 0 and self.rects[-2][0] < WIN_WIDTH:
            # Get the height of the last top rectangle
            last_top_height = self.rects[-2][3]

            # Generate new height with some randomness
            new_top_height = random.randint(
                max(0, last_top_height - self.spacer),
                min(300, last_top_height + self.spacer)
            )

            # Add new pair of rectangles on the right edge
            last_x = self.rects[-2][0]
            self.rects.append((last_x + RECT_WIDTH, 0, RECT_WIDTH, new_top_height))
            self.rects.append((
                last_x + RECT_WIDTH,
                new_top_height + TERRAIN_GAP,
                RECT_WIDTH,
                WIN_HEIGHT
            ))

    def draw(self):
        """Draw all terrain rectangles"""
        for rect in self.rects:
            pygame.draw.rect(self.window, GREEN, rect)

        # Draw border around the game area (makes it look polished)
        pygame.draw.rect(self.window, BLACK, [0, 0, WIN_WIDTH, WIN_HEIGHT], 12)

    def check_collision(self, player_rect):
        """
        Check if player crashed into terrain
        Returns True if collision detected, False if safe
        """
        for rect in self.rects:
            terrain_rect = pygame.Rect(rect)
            if player_rect.colliderect(terrain_rect):
                return True  # Collision! Game over!
        return False  # Still alive!

    def update_difficulty(self):
        """
        Progressive difficulty scaling
        Speed increases at: 50, 150, 300, 500, 750, 1050...
        Each increase requires more points than the last
        """
        # Check if we've reached the next speed threshold
        if self.score >= self.next_speed_threshold:
            self.speed_level += 1
            # Next threshold increases progressively
            self.next_speed_threshold += SPEED_INCREASE_RATE * (self.speed_level + 1)

        # Calculate speed based on level
        self.speed = INITIAL_MAP_SPEED + self.speed_level

        # Spacer (terrain variation) increases linearly
self.spacer = TERRAIN_VARIATION + self.score // SPACER_INCREASE_RATEThe Magic Behind Procedural Generation:
The key insight here is that we don’t generate a huge terrain and scroll through it. Instead, we generate terrain on the fly as the player moves forward. As terrain scrolls off the left side of the screen, we generate new terrain on the right side. It’s like a treadmill that builds itself as you run on it.
The Two While Loops: These are critical for handling high speeds. The first removes ALL off-screen segments, the second generates until the screen is filled. Without these, you’d see gaps appear at high speeds. Trust me, I learned this the hard way.
Progressive Difficulty: Notice the speed doesn’t increase every 50 points. Instead, the first increase is at 50, second at 150, third at 300, etc. This creates a smooth difficulty curve that doesn’t feel like hitting a brick wall.
Part 4: The Menu System (Because We’re Professionals Here)
A good menu system makes your game feel polished. Let’s build one with buttons, hover effects, and settings.
File: src/menu.py
"""
Menu system
Because throwing players directly into the action is so 1985
"""
import pygame
from src.settings import *


class Button:
    """A clickable button with hover effects"""
    def __init__(self, x, y, width, height, text, font):
        self.rect = pygame.Rect(x, y, width, height)
        self.text = text
        self.font = font
        self.color = DARK_GREEN
        self.hover_color = GREEN
        self.text_color = WHITE
        self.hovered = False

    def draw(self, window):
        """Draw button with current state"""
        color = self.hover_color if self.hovered else self.color
        pygame.draw.rect(window, color, self.rect)
        pygame.draw.rect(window, WHITE, self.rect, 3)  # Border

        # Center text in button
        text_surface = self.font.render(self.text, True, self.text_color)
        text_rect = text_surface.get_rect(center=self.rect.center)
        window.blit(text_surface, text_rect)

    def check_hover(self, pos):
        """Check if mouse is hovering over button"""
        self.hovered = self.rect.collidepoint(pos)
        return self.hovered

    def is_clicked(self, pos):
        """Check if button was clicked"""
        return self.rect.collidepoint(pos)


class Menu:
    """Main menu system with multiple screens"""
    def __init__(self, window):
        self.window = window
        self.title_font = pygame.font.Font(FONT_NAME, TITLE_FONT_SIZE)
        self.menu_font = pygame.font.Font(FONT_NAME, MENU_FONT_SIZE)
        self.font = pygame.font.Font(FONT_NAME, FONT_SIZE)

        # Calculate centered button positions
        button_width = 300
        button_height = 60
        button_x = WIN_WIDTH // 2 - button_width // 2

        # Main menu buttons
        self.play_button = Button(
            button_x, 250, button_width, button_height,
            "Play", self.menu_font
        )
        self.settings_button = Button(
            button_x, 330, button_width, button_height,
            "Settings", self.menu_font
        )
        self.quit_button = Button(
            button_x, 410, button_width, button_height,
            "Quit", self.menu_font
        )

        # Settings menu button
        self.back_button = Button(
            button_x, 450, button_width, button_height,
            "Back", self.menu_font
        )

        # Difficulty settings
        self.difficulty = "Normal"
        self.difficulties = ["Easy", "Normal", "Hard"]
        self.difficulty_index = 1

    def draw_main_menu(self):
        """Draw the main menu screen"""
        self.window.fill(BLACK)

        # Draw title
        title = self.title_font.render("COPTER", True, GREEN)
        title_rect = title.get_rect(center=(WIN_WIDTH // 2, 150))
        self.window.blit(title, title_rect)

        # Draw buttons
        self.play_button.draw(self.window)
        self.settings_button.draw(self.window)
        self.quit_button.draw(self.window)

        pygame.display.flip()

    def draw_settings_menu(self):
        """Draw the settings screen"""
        self.window.fill(BLACK)

        # Title
        title = self.menu_font.render("Settings", True, GREEN)
        title_rect = title.get_rect(center=(WIN_WIDTH // 2, 100))
        self.window.blit(title, title_rect)

        # Difficulty label
        diff_text = self.font.render("Difficulty:", True, WHITE)
        self.window.blit(diff_text, (WIN_WIDTH // 2 - 150, 250))

        # Current difficulty value
        diff_value = self.menu_font.render(self.difficulty, True, GREEN)
        diff_value_rect = diff_value.get_rect(center=(WIN_WIDTH // 2, 300))
        self.window.blit(diff_value, diff_value_rect)

        # Arrow indicators
        left_arrow = self.menu_font.render("<", True, WHITE)
        right_arrow = self.menu_font.render(">", True, WHITE)
        self.window.blit(left_arrow, (WIN_WIDTH // 2 - 150, 280))
        self.window.blit(right_arrow, (WIN_WIDTH // 2 + 120, 280))

        # Instructions
        instructions = self.font.render(
            "Use arrow keys or click arrows to change difficulty",
            True, GRAY
        )
        inst_rect = instructions.get_rect(center=(WIN_WIDTH // 2, 370))
        self.window.blit(instructions, inst_rect)

        self.back_button.draw(self.window)
        pygame.display.flip()

    def draw_game_over(self, score, high_score):
        """Draw game over overlay"""
        # Semi-transparent overlay
        overlay = pygame.Surface((WIN_WIDTH, WIN_HEIGHT))
        overlay.set_alpha(180)
        overlay.fill(BLACK)
        self.window.blit(overlay, (0, 0))

        # Game over text
        game_over_text = self.title_font.render("GAME OVER", True, WHITE)
        game_over_rect = game_over_text.get_rect(center=(WIN_WIDTH // 2, 200))
        self.window.blit(game_over_text, game_over_rect)

        # Scores
        score_text = self.menu_font.render(f"Score: {score}", True, WHITE)
        score_rect = score_text.get_rect(center=(WIN_WIDTH // 2, 280))
        self.window.blit(score_text, score_rect)

        high_score_text = self.menu_font.render(
            f"High Score: {high_score}", True, GREEN
        )
        high_rect = high_score_text.get_rect(center=(WIN_WIDTH // 2, 340))
        self.window.blit(high_score_text, high_rect)

        # Instructions
        restart_text = self.font.render("Press ENTER to restart", True, WHITE)
        restart_rect = restart_text.get_rect(center=(WIN_WIDTH // 2, 420))
        self.window.blit(restart_text, restart_rect)

        menu_text = self.font.render("Press ESC for main menu", True, WHITE)
        menu_rect = menu_text.get_rect(center=(WIN_WIDTH // 2, 450))
        self.window.blit(menu_text, menu_rect)

    def handle_main_menu_event(self, event):
        """Process events in main menu, returns action or None"""
        if event.type == pygame.MOUSEMOTION:
            pos = pygame.mouse.get_pos()
            self.play_button.check_hover(pos)
            self.settings_button.check_hover(pos)
            self.quit_button.check_hover(pos)

        elif event.type == pygame.MOUSEBUTTONDOWN:
            pos = pygame.mouse.get_pos()
            if self.play_button.is_clicked(pos):
                return "PLAY"
            elif self.settings_button.is_clicked(pos):
                return "SETTINGS"
            elif self.quit_button.is_clicked(pos):
                return "QUIT"

        return None

    def handle_settings_event(self, event):
        """Process events in settings menu"""
        if event.type == pygame.MOUSEMOTION:
            pos = pygame.mouse.get_pos()
            self.back_button.check_hover(pos)

        elif event.type == pygame.MOUSEBUTTONDOWN:
            pos = pygame.mouse.get_pos()
            if self.back_button.is_clicked(pos):
                return "BACK"

            # Check arrow clicks for difficulty
            if 280 < pos[1] < 330:
                if WIN_WIDTH // 2 - 150 < pos[0] < WIN_WIDTH // 2 - 100:
                    self.change_difficulty(-1)
                elif WIN_WIDTH // 2 + 100 < pos[0] < WIN_WIDTH // 2 + 150:
                    self.change_difficulty(1)

        elif event.type == pygame.KEYDOWN:
            if event.key == pygame.K_LEFT:
                self.change_difficulty(-1)
            elif event.key == pygame.K_RIGHT:
                self.change_difficulty(1)

        return None

    def change_difficulty(self, direction):
        """Cycle through difficulty options"""
        self.difficulty_index = (self.difficulty_index + direction) % len(self.difficulties)
        self.difficulty = self.difficulties[self.difficulty_index]

    def get_difficulty_multiplier(self):
        """Get speed multiplier for selected difficulty"""
        if self.difficulty == "Easy":
            return 0.7  # 30% slower
        elif self.difficulty == "Normal":
            return 1.0  # Standard speed
        else:  # Hard
return 1.5 # 50% faster (good luck!)Menu Design Philosophy:
Menus should be intuitive and visually clear. We use:
- Hover effects to show what’s clickable
- Centered layouts because symmetry is pleasing to the eye
- Clear visual hierarchy (title bigger than buttons, buttons bigger than instructions)
- Multiple input methods (mouse clicks OR keyboard) for accessibility
The difficulty multiplier is a simple but effective way to change game feel without rewriting game logic.
Part 5: Tying It All Together (The Game Class)
Now we bring everything together into a cohesive game with proper state management.
File: src/game.py
"""
Main game class - The conductor of our orchestra
"""
import pygame
from src.settings import *
from src.player import Helicopter
from src.terrain import Terrain
from src.menu import Menu


class Game:
    """Main game controller"""
    def __init__(self):
        pygame.init()
        self.window = pygame.display.set_mode((WIN_WIDTH, WIN_HEIGHT))
        pygame.display.set_caption('Copter')

        self.clock = pygame.time.Clock()
        self.font = pygame.font.Font(FONT_NAME, FONT_SIZE)

        # Initialize game objects
        self.player = Helicopter(PLAYER_START_X, PLAYER_START_Y)
        self.terrain = Terrain(self.window)
        self.menu = Menu(self.window)

        # Game state management
        self.state = "MENU"  # MENU, SETTINGS, PLAYING, GAME_OVER
        self.running = True
        self.high_score = 0
        self.game_started = False  # Has player pressed spacebar yet?

    def reset_game(self):
        """Reset everything for a new game"""
        player_start_y = self.terrain.reset()
        self.player.reset(player_start_y)
        self.game_started = False

    def draw_score(self):
        """Draw score with outline for visibility on any background"""
        score = self.terrain.score

        # Draw score at top with black outline
        self._draw_text_with_outline(
            f'Score: {score}',
            (20, 15),
            WHITE,
            BLACK
        )

        # Draw high score at bottom
        self._draw_text_with_outline(
            f'High Score: {self.high_score}',
            (20, WIN_HEIGHT - 35),
            WHITE,
            BLACK
        )

        # Show "Press SPACE to start" before game begins
        if not self.game_started:
            instruction = "Press SPACE to start"
            text = self.font.render(instruction, True, WHITE)

            # Black background box for readability
            padding = 10
            bg_rect = text.get_rect(center=(WIN_WIDTH // 2, 30))
            bg_rect.inflate_ip(padding * 2, padding)
            pygame.draw.rect(self.window, BLACK, bg_rect)
            pygame.draw.rect(self.window, WHITE, bg_rect, 2)

            self.window.blit(text, text.get_rect(center=(WIN_WIDTH // 2, 30)))

    def _draw_text_with_outline(self, text, pos, color, outline_color):
        """Draw text with outline for better visibility"""
        # Draw outline in four directions
        for dx, dy in [(-2, -2), (-2, 2), (2, -2), (2, 2)]:
            outline = self.font.render(text, True, outline_color)
            self.window.blit(outline, (pos[0] + dx, pos[1] + dy))

        # Draw main text on top
        text_surface = self.font.render(text, True, color)
        self.window.blit(text_surface, pos)

    def handle_events(self):
        """Process all pygame events"""
        for event in pygame.event.get():
            if event.type == pygame.QUIT:
                self.running = False

            # State-specific event handling
            if self.state == "MENU":
                action = self.menu.handle_main_menu_event(event)
                if action == "PLAY":
                    self.state = "PLAYING"
                    self.reset_game()
                elif action == "SETTINGS":
                    self.state = "SETTINGS"
                elif action == "QUIT":
                    self.running = False

            elif self.state == "SETTINGS":
                action = self.menu.handle_settings_event(event)
                if action == "BACK":
                    self.state = "MENU"

            elif self.state == "PLAYING":
                if event.type == pygame.KEYDOWN:
                    if event.key == pygame.K_SPACE:
                        self.player.set_flying(True)
                        # Start the game on first spacebar press
                        if not self.game_started:
                            self.game_started = True

                elif event.type == pygame.KEYUP:
                    if event.key == pygame.K_SPACE:
                        self.player.set_flying(False)

            elif self.state == "GAME_OVER":
                if event.type == pygame.KEYDOWN:
                    if event.key == pygame.K_RETURN:
                        # Restart game
                        self.state = "PLAYING"
                        self.reset_game()
                    elif event.key == pygame.K_ESCAPE:
                        # Back to menu
                        self.state = "MENU"

    def update(self):
        """Update game logic"""
        if self.state == "PLAYING" and self.game_started:
            # Update player physics
            self.player.update()

            # Update terrain (scrolling and generation)
            self.terrain.update()
            self.terrain.update_difficulty()

            # Apply difficulty multiplier and speed cap
            difficulty_mult = self.menu.get_difficulty_multiplier()
            self.terrain.speed = min(self.terrain.speed * difficulty_mult, MAX_SPEED)

            # Check for collisions
            player_rect = self.player.get_rect()
            if self.terrain.check_collision(player_rect):
                self.state = "GAME_OVER"
                # Update high score if needed
                if self.terrain.score > self.high_score:
                    self.high_score = self.terrain.score

    def draw(self):
        """Render current game state"""
        if self.state == "MENU":
            self.menu.draw_main_menu()

        elif self.state == "SETTINGS":
            self.menu.draw_settings_menu()

        elif self.state == "PLAYING":
            self.window.fill(BLACK)
            self.terrain.draw()
            self.player.draw(self.window)
            self.draw_score()
            pygame.display.flip()

        elif self.state == "GAME_OVER":
            # Keep the last frame visible
            self.terrain.draw()
            self.player.draw(self.window)
            self.menu.draw_game_over(self.terrain.score, self.high_score)
            pygame.display.flip()

    def run(self):
        """Main game loop - The heartbeat of our game"""
        while self.running:
            self.clock.tick(FPS)  # Maintain consistent frame rate
            self.handle_events()  # Process input
            self.update()         # Update game state
            self.draw()           # Render everything

pygame.quit()The Game Loop Explained:
Every game has a main loop that runs continuously (60 times per second in our case). Each iteration:
- Tick the clock – Ensures consistent frame rate
- Handle events – Process keyboard/mouse input
- Update – Calculate new positions, check collisions, etc.
- Draw – Render everything to the screen
This is called the “game loop” and it’s fundamental to all real-time games.
State Management: We use a simple string-based state machine (“MENU”, “PLAYING”, etc.). For a larger game you’d want a more robust system, but for our purposes, this works great and is easy to understand.
Part 6: The Entry Point
Finally, let’s create the entry point that starts everything.
File: main.py
"""
Copter Game - Main Entry Point
Run this file to start the game!
"""
from src.game import Game


def main():
    """Initialize and run the game"""
    print("=" * 50)
    print("🚁 COPTER GAME")
    print("=" * 50)
    print("Controls:")
    print("  SPACEBAR - Fly up (hold to ascend)")
    print("  ENTER    - Restart (when game over)")
    print("  ESC      - Return to menu (when game over)")
    print("=" * 50)
    print("Starting game...")
    print()

    game = Game()
    game.run()

    print("Thanks for playing! 🚁")


if __name__ == "__main__":
main()Part 7: Running Your Game
To run your masterpiece:
python main.pyIf you get an error about Pygame not being found, make sure you installed it:
pip install pygameIf you want to add a helicopter image (highly recommended), add a PNG file to assets/helicopter.png. The game will automatically use it!
Common Issues and Solutions
Problem: “The helicopter falls through the floor!”
Solution: Check your collision detection. Make sure you’re calling check_collision() every frame during gameplay.
Problem: “Gaps appear in the terrain at high speeds!”
Solution: This was fixed with the while loops in terrain.update(). Make sure you’re using while loops, not if statements, for both removing and generating terrain.
Problem: “The game is too hard/easy!”
Solution: Tweak these values in settings.py:
GRAVITY– Higher = harder to controlTERRAIN_GAP– Smaller = harder to fit throughINITIAL_MAP_SPEED– Higher = less time to reactSPEED_INCREASE_RATE– Smaller = difficulty ramps up faster
Problem: “My score is invisible against the background!”
Solution: We use text with outline (_draw_text_with_outline()) specifically for this reason. The outline makes it visible against any background.
Problem: “The game starts immediately and I’m not ready!”
Solution: That’s why we have the game_started flag. The game waits for your first spacebar press before terrain starts moving.
What We’ve Learned
Congratulations! You’ve just built a complete game from scratch. Let’s review what we covered:
- Project Structure – Organizing code into logical modules
- Game Loop – The fundamental pattern of all real-time games
- Object-Oriented Design – Using classes to encapsulate functionality
- Procedural Generation – Creating content algorithmically
- Physics Simulation – Implementing gravity and movement
- Collision Detection – Determining when things hit each other
- State Management – Handling different game states (menu, playing, game over)
- Progressive Difficulty – Making games challenging but fair
- User Interface – Creating menus and displaying information
- Polish – Adding those final touches that make a game feel professional
Ideas for Enhancement
Want to take this further? Here are some ideas:
Easy Additions:
- Sound effects – Pygame can play WAV files
- Particle effects – Explosion when you crash
- Different themes – Ice caves, lava caves, space tunnels
- Power-ups – Shields, slow-motion, invincibility
Medium Difficulty:
- Multiple helicopter types – Each with different physics
- Obstacles – Moving obstacles, not just terrain
- Achievements – “Reach score 500”, “Play 10 games”, etc.
- Local multiplayer – Two helicopters racing
Advanced Projects:
- Level editor – Let players design their own caves
- Online leaderboard – Store high scores in a database
- AI opponent – Computer-controlled helicopter
- Mobile version – Port to iOS/Android using Kivy
Final Thoughts
Building games is incredibly rewarding. You start with a blank screen and end up with something interactive that people can enjoy. Sure, your first game might not be the next Minecraft, but every expert was once a beginner who didn’t give up.
The code structure we used here is production-ready. It’s organized, maintainable, and extensible. You can use this pattern for much larger projects. In fact, many professional games use similar architectures.
Most importantly: have fun! Game development should be enjoyable. If you find yourself frustrated, take a break, play some games for “research,” and come back with fresh eyes.
Now go forth and create! And when you inevitably spend three hours tweaking the shade of green for your terrain at 2 AM, remember: we’ve all been there, and it’s perfectly normal. Welcome to game development! 🚁
Complete Code Repository
All the code from this tutorial is available as a complete, working project. The file structure should look like this:
├── main.py
├── assets/
│ └── helicopter.png (optional)
└── src/
├── __init__.py
├── game.py
├── player.py
├── terrain.py
├── menu.py
└── settings.py
Don’t forget to create an empty __init__.py file in the src folder so Python recognizes it as a package!
One more thing: When you inevitably show this game to friends and family, and they ask “So when will it be on Steam?”, just smile and say “Soon™”. That’s the official game developer response.
Please feel free to reference the GitHub repository I have created for this project. I recommend that you give it a try first on your own, but if you get stuck, please use the repo as a guide.
If you have any questions or comments, please feel free to use the comment box in this article and I will respond as soon as possible.
Happy coding! 🎮
